Tag: Hair Oils

  • Easy Homemade Deep Conditioners to try for Natural Hair 

    Easy Homemade Deep Conditioners to try for Natural Hair 

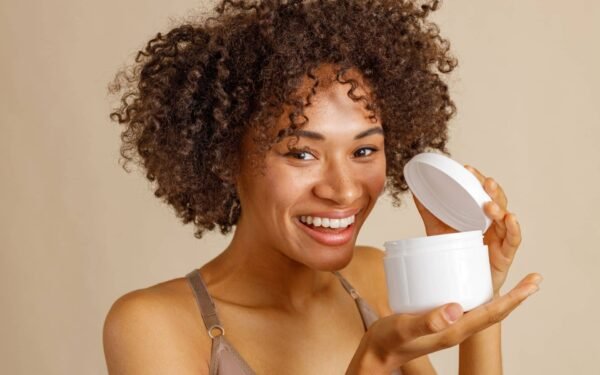
    Deep conditioning treatments are an essential part of many Naturalista’s hair care routine. It’s that one treat your hair will thank you for once done because of its nourishing, hydrating and moisturising benefits. With natural hair care costs being more expensive compared to our counterparts. There’s no surprise homemade deep conditioners have become increasingly popular. They’re easy to make, significantly cheaper and give you more control on what ingredients you apply to your hair and scalp.

    We’ll give you a run down on the best ingredients to include in your homemade deep conditioners and some recipes to help your natural hair thrive. If you’re not a fan of DIY and prefer a ready made product, then read our post on Top 8 Deep Conditioners to try for Type 4 hair. 

    How do you make deep conditioner for natural hair at home? 

    The process is pretty simple, all you need is a blender or whisk, some containers and the right ingredients. The process shouldn’t take too long and if you like you can batch create the conditioners and store them away. Depending on the ingredients you’ll be using, you may have to store them in the fridge to keep them from going bad. 

    What are the best ingredients for homemade deep conditioners for natural hair?

    The ingredients you choose will vary depending on your hair needs. Regardless of what deep conditioner you decide to make, you’ll either opt for one with moisturising or protein benefits. Or you can opt for one with a balance of both. The most common ingredients included in most homemade deep conditioners include;

    • Avocados : Rich in vitamins and biotin which helps strengthen, moisturise and repair your hair leaving it looking healthy and shiny
    • Shea Butter : It’s full of fatty acids and anti-inflammatory properties. Which helps hydrate your hair and minimises frizz leaving you with healthy looking kinks, coils and curls.
    • Coconut Milk : Another ingredient full of fatty acids and moisturising benefits. It helps restore your hair and scalp whilst nourishing and protecting damaged strands from breakage.
    • Yoghurt : Rich in vitamins and nutrients which helps revive limp and dry hair. It also has anti-inflammatory benefits which is great for treating dandruff and strengthening your hair follicles.
    • Mayonnaise : Contains protein and great for restoring damaged, dry and brittle hair. It’s quite oily as it contains vegetable oil but it’s great for adding that extra shine and leaving your hair soft. 
    • Honey : A natural humectant which helps hair retain moisture. It adds a nice slip to the product making it easy to apply but also leaves your hair feeling soft and aids with detangling.
    • Eggs : Mainly used for strengthening treatments due to its high protein content protecting your hair strands and preventing breakage. Some naturals have raved about eggs’ ability to promote hair growth but results may vary.
    • Oils : Great for adding extra shine and helping lock in moisture. They have additional wide ranging benefits which will vary depending on what oils you use. 

    TIP – purchase organic ingredients, they’re less likely to have any added chemicals in them and you want to be using the best ingredients when making homemade deep conditioners.

    What oils to use in homemade deep conditioners for natural hair?

    It’s best to use lightweight oils with moisturising benefits to help the ingredients penetrate through the hair shaft. Moisturising oils are known for their ability to penetrate through the inner and outer layers, helping you preserve moisture inside your hair follicles and preventing it from leaving. This makes it a great option for deep conditioning treatments as opposed to sealing oils. Which are known for sitting on top of the hair strands locking out moisture.

    Lightweight oils

    Here are list of oils you’ll want to choose ; 

    • Olive Oil 
    • Avocado Oil
    • Coconut Oil 
    • Peppermint oil 
    • Rosemary Oil 
    • Castor or JBCO Oil (this is a sealing oil but works great in deep conditioners too)

    Click here to learn more about moisturising vs sealing oils and when to use them.

    5 homemade deep conditioners for natural hair 

    1. Avocado & Honey Deep Conditioner 

    Great for all Type 4’s (4A, 4B & 4C) and helps prevent damage and breakage whilst strengthening your natural hair. It has multiple moisturising benefits and helps eliminate frizz. 

    Homemade Deep Conditioner for Natural Hair

    Ingredients 

    • 1 Avocado 
    • ½ a cup of Coconut Milk
    • 2 Tablespoons of Honey 
    • 1 Tablespoon of Olive Oil 

    How to Make?

    1. Break the avocado into smaller pieces to make blending easier
    2. Put the avocado, honey and coconut milk into the blender
    3. Pulse the blender until it become slightly smooth and then add the olive oil
    4. Blend the mixture again until it has a smooth consistency
    5. Voila! Your deep conditioner is ready to use 
    6. Apply to length of your hair and let it sit for at least 30 mins before rinsing

    2. Banana & Coconut Oil Deep Conditioner

    Bananas contain potassium and lots of vitamins which will help improve the overall health of your hair. It’s also great for those who suffer from itchiness and dandruff. 

    Homemade Deep Conditioner

    Ingredients

    • 2 – 3 overripe bananas 
    • 2 tablespoons of honey 
    • 1 tablespoon of coconut oil 

    How to Make?

    1. Peel the bananas and mash with a fork 
    2. Melt the coconut oil over a stove or in the microwave 
    3. Place the mashed bananas, coconut oil and honey into a blender
    4. Blend the mixture until you achieve a smooth consistency
    5. Voila! Your deep conditioner is ready to use 
    6. Apply to length of your hair and let it sit for at least 30 mins before rinsing

    TIP – if you suffer from extreme itchiness then massage into your scalp before letting the mixture sit.

    3. Mayonnaise & Egg Deep Conditioner – Great for damaged, dry, colour treated and brittle hair

    Great for damaged and brittle hair. Especially if you’ve experienced damage from heat, hair dye or bleaching. Both mayonnaise and eggs are high in protein which will act as a strengthening treatment. It helps strengthen your hair and reverse damage whilst adding thickness. 

    Homemade Deep Conditioner for Natural Hair

    Ingredients

    • 1 cup of mayonnaise
    • 2 large eggs
    • 1 tablespoon of honey
    • 1 tablespoon of olive oil (this is optional, mayonnaise contains a lot of vegetable oil so only use if needed) 

    How to Make?

    1. Place the mayonnaise into a mixing bowl
    2. Crack the 2 eggs and whip into the mayonnaise
    3. Add the honey to the mixture and mix until you achieve a smooth consistency 
    4. If mixture is dry, add the olive oil and give it a mix
    5. Voila! Your deep conditioner is ready
    6. Apply to length of your hair and let it sit for at least 30 mins before rinsing

    4. Shea Butter & Avocado Deep Conditioner

    Avocado and Shea Butter are both rich in fatty acids and have great moisturising benefits. This is a rich mixture so you’ll need more oils for a smooth consistency. This is great for all Type 4’s (4A, 4B, 4C) especially if you’re experiencing dryness or just want to give your coils and curls extra hydration.

    Homemade Deep Conditioner for Natural Hair

    Ingredients

    • ½ to ¾ cup Shea Butter depending on your hairs length
    • 1 Avocado
    • 3 tablespoon of coconut oil
    • 1 tablespoon of rosemary oil
    • 1 tablespoon of olive oil

    Other: depending on your hairs needs you can opt for other oils such as tea tree oil, castor oil, JBCO, argan oil etc. you can experiment with different oils with this mixture – the choice is yours!

    How to Make?

    1. Melt the shea butter and mash the avocado
    2. Place them in a blender and pulse until it becomes slightly smooth
    3. Melt the coconut oil and add to the mixture
    4. Add the olive and rosemary to the blender and mix until you achieve a smooth consistency 
    5. Voila! Your deep conditioner is ready
    6. Apply to length of your hair and let it sit for at least 30 mins before rinsing

    5. Greek Yoghurt and Banana Deep Conditioner 

    Yoghurt is cheap but has many benefits for your natural hair. Just make sure you pick a plain yoghurt with no added extras. You can either use plain or greek yoghurt depending on your preference. Regular yoghurt is great for moisture treatments whilst greek yoghurt is great for protein treatments. 

    Homemade Deep Conditioner for Natural Hair

    Ingredients 

    • 1 cup of plain or greek yoghurt
    • 1 – 2 ripe bananas
    • 1 tablespoon of honey 
    • 2 – 3 tablespoons of olive oil 

    How to Make?

    1. Mash the banana 
    2. Mix the mashed banana with the yoghurt
    3. Add honey and olive oil to the mixture and whisk until smooth 
    4. Voila! Your deep conditioner is ready
    5. Apply to length of your hair and let it sit for at least 30 mins before rinsing

    How long will the benefits last?

    You should start feeling the benefits of your deep conditioning treatment from the moment you rinse out the product. This typically lasts anything from 2 – 4 weeks but consistency is the key to experience long-lasting benefits. Aim to deep condition your hair at least once a month. It may feel like a time consuming process but trust me, your hair will thank you in the long run. If you’re experiencing dryness or damage then try and do it every 2 weeks until you see improvements to the health of your hair. If you don’t have time then use a heat cap or steamer to speed up the process. 

    Deep conditioning Tips for Natural Hair 

    • Start of with freshly washed and detangled hair
    • Comb or brush the product through your hair to ensure its evenly distributed across the length of your hair 
    • Always use heat to help open up your hair cuticles and let the ingredients penetrate 
    • Let it sit for at least 30 mins – 1 hour
    • Don’t overload on protein and moisture treatments, alternate between the 2 depending on your hair needs. You’re hair needs moisture more than protein so it’s likely you’ll be doing the moisture treatments more often
    • Ensure the product has been thoroughly been rinsed out with lukewarm water
    • Always apply leave in conditioner after treatment 

    Final Thoughts 

    Making homemade deep conditioners for your natural hair helps you customise treatments to suit your hair needs. It allows you to tackle the problem you’re facing at that point in time i.e. heat damage, itchy scalp, dry hair etc. It’s also fun to make your own treatments and experiment from time to time. We’ve included some recipes if you’re not sure on what deep conditioner to make and if you like, feel free to add additional ingredients where you see fit.

    Have you tried making your own homemade deep conditioner? What’s your go-to recipe?

  • Moisturizing vs Sealing Oils – What’s the better option?

    Moisturizing vs Sealing Oils – What’s the better option?

    It’s easy to be confused about what hair oils to incorporate into your natural hair care routine. With so many oils on the market, it makes it difficult to figure out what oils to choose. Some oils act as a moisturizing agent whilst other oils work as a sealing agent. They both add great benefits to help you achieve healthy luscious locks. But what one should you be using? Moisturizing vs Sealing oils? This is the question many naturals ask but may not fully understand.

    In this article, we’ll be breaking down the differences between the two types of oils to help you understand what to use and when. 

    Why Oils form an Important part of your hair journey?

    Our scalp naturally produces oils, otherwise known as sebum which helps hydrate and protect our hair follicles. Studies show “sebum secretion can be normal, reduced or increased on the scalp of afro textured hair. But our curl pattern can impair the normal distribution of natural oils along the hair shaft from root to tip, giving it a dull and dry look.”1 Which is why using hair oils can help with the additional distribution of the essential oils along the length of your hair strands. 

    Incorporating hair oils into your natural hair routine improves the overall health of your hair. Some of these benefits include;

    • Strengthening your hair strands and cuticles
    • Support with moisture retention
    • Minimising the risk of breakage 
    • Promoting hair growth 
    • Reduces frizziness 
    • Adds extra shine 

    You can incorporate oils into your hair in many ways. It’s highly likely you’ve used oils for pre-poo treatments, hot oil treatments, sealing your ends and oiling your scalp. But it’s important to use the correct oils to get optimum results. Regardless of what treatment you’re doing, you’ll be using a moisturizing or sealing oil. Let’s delve into them in a bit more detail.

    moisturizing vs sealing oils

    What are moisturizing oils?

    Moisturizing oils penetrate right through the hair shaft to hydrate and moisturize your hair. It has the ability to penetrate through the inner and outer layers, helping you preserve moisture inside your hair follicles and preventing it from leaving. These types of oils support moisture retention and help strengthen your hair whilst reducing the possibility of breakage. You’re more likely to use these oils for hair treatments.

    What are sealing oils?

    Sealing oils lock in moisture and stop it from leaving your hair strands by sealing it in. They work a little differently to moisturizing oils, as the oils sit on top of the hair strands as opposed to entering the hair shaft. These oils act as a layer of protection to keep moisture in and stop it from evaporating. They tend to be slightly thicker in texture in comparison to moisturizing oils and usually used as a last step in your hair maintenance routine. You’re more likely to use these oils for daily styling and hair maintenance

    Examples of Moisturizing VS Sealing Oils

    When to use moisturizing vs sealing oils?

    Moisturizing oils are best used for hair treatments due to its penetrating effects whilst sealing oils are best for every day styling and maintenance to lock in that moisture and keep it from escaping. Let’s talk about some treatments to help you understand how this works in reality! 

    Hot oil treatments : 

    Hot oil treatments are typically used in colder months and helps add extra shine and moisture to your hair. As the oil is warm or hot when applying, it penetrates through the hair shaft quickly as the heat helps open up the hair cuticles. This helps strengthen your hair follicles keeping your hair protected and hydrated. As the treatment is focussed on achieving moisture benefits – its best to use a moisturizing oil.

    Pre-poo/Pre shampoo treatments : 

    Preppoo treatments act as moisturizing treatment which is applied to the scalp prior to shampooing your hair. Using oils with moisturizing benefits helps prepare your hair for cleansing. The oils protect your hair & scalp from being stripped from its natural oils (sebum) when using shampoos which can sometimes be harsh on your coils & curls. Without it, your hair could become extremely dry which could lead to breakage, tangles and knots. Using a moisturizing oil is best for pre-pooing due to its ability to penetrate through the shaft whilst sealing oils might be too heavy and may affect your hair from reaping the full benefits of the treatment. 

    LOC vs LCO Method : 

    When using the LOC method, you’ll want to opt for a moisturizing oil as opposed to a sealing oil as you still need to apply your cream afterwards. Sealing oils are good at keeping moisture out. And if you’re applying your cream last – you’ll be locking out all the moisture and hydration benefits. 

    With the LCO method, you’re applying the oil last after you’ve applied the liquid and cream so you’ll be using a sealing oil on this occasion. The oil acts like a sealant for the liquid and cream helping you keep your hair moisturized for longer. Want to learn more about LOC vs LCO? Click here 

    Braid Outs & Twist Outs :

    When doing braid outs and twists out, you’ve probably used a leave-in conditioner, curl cream or pudding and/or mousse. All these products have moisturizing and hydration ingredients that help your hair become soft and easy to style. Whilst giving it a nice bounce afterwards. In this case, you want to use a sealing oil to lock in the moisture helping the style last longer. You can always do a refresh in between but it’s likely you’ll be rocking the style for at least 5 days and the sealing oil acts as a film to lock in the moisture for that duration.

    moisturizing vs sealing oils

    Summary re; Moisturizing vs Sealing Oils

    Moisturizing oils penetrate deep into your hair and get right inside your hair shaft. It works well with water based products due to its penetrating effects and helps nourish and hydrate your hair from the inside out. Always opt for these oils when doing hair treatments that are focussed on hydrating your hair. 

    Sealing oils are layered on top of your hair after you’ve finished moisturizing and hydrating your hair. The oil acts as a sealant to lock in all the moisture you’ve worked so hard to get into your hair strands. It’s important to note that it also locks out any new moisture from getting into your hair strands. Which is why you should always use it as a last step in your moisture routine. 

    FAQ’s re; Moisturizing vs Sealing Oils 

    1: How often should you moisturize and seal?

    Depending on the quality of the products you’re using, you should be moisturizing your hair every 3 – 7 days. Everyone’s hair is different and some may be drier than others so you’ll need a bit of trial and error to figure out if it should be slightly less or more. In between washes, you can always spritz your hair with water and follow up with your moisturizer. Just remember that sealing oils act as a film and will stop any new moisture from entering the hair shaft. So only moisturize and seal when you need to as opposed to daily to stop any build up of product sitting on your hair.

    2: Can you over moisturize your hair? AND What does moisture overload look like?

    The simple answer is YES – you can definitely over moisturize your hair. Having a balance of moisture and protein is vital for healthy hair. You won’t need to use protein as often but it’s good to incorporate it into your routine every 1 to 2 months depending on your hair needs. You’ll know if you’re experiencing moisture overload because your hair will feel limp, mushy and overly soft. You can also tell from your curl pattern as it’ll struggle to hold shape and lack definition. A quick fix is doing a protein treatment or a clay mask which will help detoxify your hair and support the restructure of the cuticles. Remember, protein strengthens your hair and gives it structure. Whilst moisture is equally as important to minimize dryness and breakage. Having the right moisture and protein balance will help your hair thrive.

    3: Is Argan Oil a moisturizing or sealing oil?

    Argan oil has both moisturizing and sealing benefits. It’s known for penetrating, coating and lubricating your hair whilst protecting it from harsh chemicals. Argan oil is rich in vitamins such as vitamin A, C and E but also loaded in antioxidants and fatty acids. It’s more expensive than other oils bearing in mind its richness but great for scalp and hair care. It basically offers you the best of both worlds in comparison to other oils.

    4: Is shea butter moisturizer or sealant?

    Shea butter helps seals in moisture and softens the hair. It’s a sealant and not a moisturizer but some people confuse it as a moisturizer because it makes your hair feel more hydrated when applied giving you the illusion of moisture. Shea butter contains butter which seals water based products into the hair but doesn’t hydrate it. It’s filled with fatty acids which helps enhance hydration by reducing evaporation. Shea butter can be found in many products such as deep conditioners, hair creams and treatments. Although it’s a sealant, it also has hydrating benefits due to its water binding properties. So if you do decide to use it as a moisturizer, it’s best to mix it with other ingredients to get the best out of it. 

    Final Thoughts 

    We hope this clarifies everything you need to know re; moisturizing vs sealing oils. Oils are a great way of achieving moisture retention in between hair treatments, daily hair maintenance and styling. They’re designed to add moisture and shine to your hair and scalp whilst helping you lock that moisture in for long periods of time. The key is to use the right oils! It’s easy to remember what oil does what via the name i.e. Moisturizing = moisture and Sealing = sealant. Just do some research on oils that fall into the two categories before picking them. We’ve named the most popular ones in the article but feel free to experiment with other oils and if you like you can mix essential oils together to create your own mix.

    SOURCES

    1. Black women’s hair: the main scalp dermatoses and aesthetic practices in women of African ethnicity. Tanus A, Oliveira CCC, Villarreal DJV, Sanchez FAV, Dias MFRG. An Bras Dermatol. 2015;90(4):450-67.
      https://www.ncbi.nlm.nih.gov/pmc/articles/PMC4560533/ ↩︎