
Share This Article
This post may contain affiliate links and we may get paid a small commission if you click on a link.
Please read our privacy policy and cookies disclosure.
Afro textured hair is naturally curly or coily depending on your hair type. You usually see your curl pattern when you wash or wet your hair but as it begins to dry the texture will change depending on how you style it. Most of us want to rock our hair in our natural curly or coily pattern but struggle to figure out how to keep the curls/coils defined as it dries. This is frustrating for many women especially when you’ve watched a youtube video, followed all the correct steps and the style looks completely different to what you expected.
In this article we’ll be covering everything you need to know to help you get more defined curls on coils on natural hair. Before we get started with methods and techniques on how to enhance your natural curl pattern. It’s important to identify your hair type to help you decide what method will work best for you.
Understanding your hair type
Curly and coily hair falls within the Type 3 and 4 range. Type 3 hair tends to be curly whilst Type 4 hair tends to be coily. It’s more than likely you’ll have a mixture of hair types as opposed to 1. For instance; I have Type 4A, 4B and a very small portion of Type 3A curls. Don’t worry, it’s absolutely normal to have a variety of textures. The most common reason is genetics but other factors such as weather, colouring/bleaching, constant use of heat or doing a texture release all have a part to play.
Here are some characteristics to help you figure out your curl pattern;
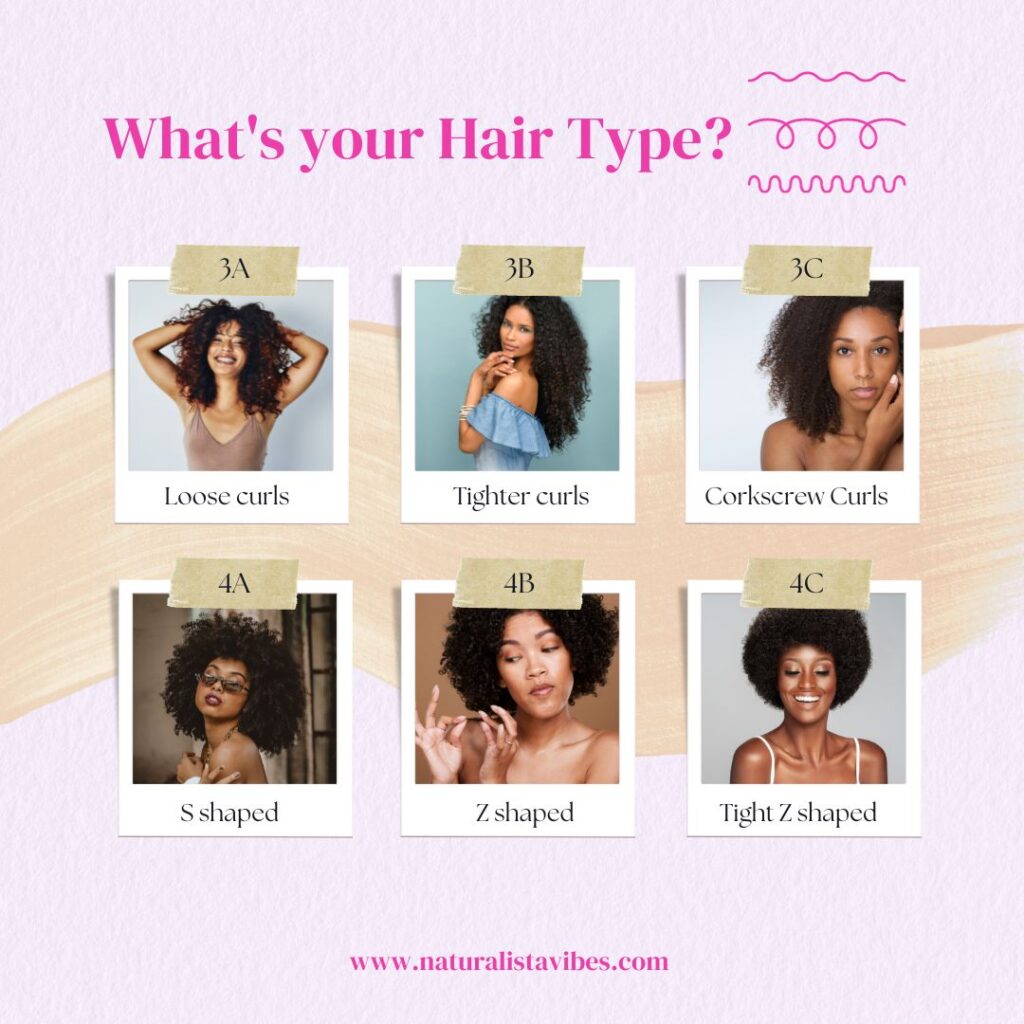
Type 3 Hair
- Type 3a : Hair with loose curls—there is now a definite curl pattern and no longer just waves
- Type 3b ; Hair with curls that begin to get tighter
- Type 3c ; Hair with curls that are very tightly curled—corkscrew curls
Type 4 Hair
- Type 4a :Hair with “kinky-coily” curls that are defined with an “S”-shaped pattern or coil
- Type 4b : Hair with “kinky-coily” curls with a “Z”-shaped pattern or coil
- Type 4c :Hair with “kinky-coily” curls that are tightly coiled with a very tight “Z”-shaped pattern
Use the diagram and characteristics as a guide to figure out your hair type. This is the 1st step you should take and will help you figure out what steps to incorporate into your hair regimen and identify what products will work best to aid more defined curls or coils on your natural hair.
How to achieve more defined curls and coils on natural hair
Achieving defined curls/coils starts with your hair regimen. Ensuring you’re getting the right amount of moisture into your strands and layering your products in the right way to support the curl/coil definition. Here are some key steps to follow prior to choosing what technique you’ll use to define your curls and coils.
1. Start with clean hair:
Opt for a moisturising or hydrating shampoo when cleansing your natural hair. We recommend at least 2 washes to ensure your hair is fully clean from any products used in the past. You should also use a clarifying shampoo once every 1 to 2 months to remove product build up. TIP – do a final rinse with cold water to lock in moisture, leaving your hair with less frizz.
2. Work in sections to make the process more manageable:
Most naturals work in 4 sections but you may decide more or less depending on your hair length and volume. Working in sections also ensures you’ve tackled every part of your hair equally and minimises tangling.
3. Detangle thoroughly!
You want to ensure your hair is fully detangled before adding any styling products. Use a product that has a lot of slip to minimise any tugging and pulling of your hair. Also, water is your friend – it’s always easier to detangle coily and curly hair on damp or wet hair.
4. Moisturise and seal your ends:
The key to defined curls and coils is moisture and hydration. Use a leave-in conditioner with moisturising benefits and seal with an oil. Sealing oils prevents moisture from getting out and will help your leave-in conditioner to fully penetrate deep into your strands. Examples of sealing oils are black castor, grapeseed and jojoba oil.
5. Identify the right products for your hair type:
There are a variety of products on the market that can help you achieve more definition for your hair but it’s important to identify what products will work best for your Type 3 or 4 hair type. What works for 3C hair might not work so well on 4C hair so do your research. Check out reviews, youtube or social media tutorials to see what fellow naturals have to say. If you’re still unsure, then look into purchasing sample size products to test them out on your hair. The products you want to purchase to achieve more definition are curl defining creams, custards, mousses and gels.
6. Layer your products the right way!
This is an important step – applying your product the right way is key to your curls / coils becoming defined but also lasting a long time. Apply all products to damp or wet hair and not dry hair. The basic guideline is to start with the lightest product first and finish with the heaviest. Everyone’s hair is different so you may apply slightly differently as a rule of thumb. You want to start with a leave-in, curling cream, mousse and then finish with a gel. OR you might opt for just a leave in mousse and gel. It all depends on what works best for your hair.
7. Use the right styling tools:
There are certain tools that can help with adding extra definition. Stay away from wide tooth combs when you’re trying to define your curls. You want to utilise brushes like a denman or flexi detangling brush. These brushes are designed to detangle your hair reducing clumps and knots whilst defining your natural curl pattern.
8. Additional TIP – use a bentonite clay mask once every 3 months:
Bentonite clay is known to draw out impurities from hair and scalp. But an additional benefit is it defines curls. Naturals swear by the it’s ability to clump curls together and define hair. NOTE : It’s not something that should be used regularly. If you notice your hair is really dry and struggling with definition, then add this to your regimen on a quarterly basis.

8 techniques to achieve defined curls and coils on natural hair
Wash N Go
This is one of the most popular techniques for defining coils and curls. It also makes wash day styling easy as the majority of the method takes place in the shower. All you’re doing is adding the styling products onto your hair once you’ve finished your cleansing and conditioning routine. It’s typically a heat free method and once your hair is styled – you let it air dry. However, some naturals do use a diffuser on a low setting as it can take a long time to dry due to the layering of multiple products. This method works for all hair textures (Type 3 & 4) and is a great way of re-discovering your natural curls.
Shingling Method
Shingling is a styling technique where you apply your curling product onto your hair in small sections. You can either use a curling cream, pudding or gel. Apply a small amount through each curl to separate and smooth it into a bouncy coil using your fingers. It can be quite a tedious process as you’ll be working on very small sections so be patient. Pay attention to each section so you’re not applying too much product but also so the curls/coils come out equally across your hair. Although shingling has some similar elements to the wash n go.The main difference with wash n go is you apply the product over the top of your curls. The shingling method requires you to separate, stretch, and smooth the product onto every curl.
Finger coiling
Finger coiling is an enhancement of the wash n go method. The curls tend to be dense and thicker than your natural curls. All you need to do is use your fingers to create the shape once you’ve cleansed and conditioned your hair. Once you’ve applied the product of your choice, use your fingers to curl, twist out, twirl out or coil your hair. This method requires patience and practise so it’s okay if you don’t get it right the first time round. Watch the video below to learn more.
Curlformers
This is a heat-free curling tool that helps you reshape your curly / coily hair. They come in three styles : barrel, spiral and corkscrew. Curlformers work by keeping your hair curled as it dries and the process is simple too. You apply the curlformers to sections of your hair (ideally wet or damp hair) and then let it air dry. Most people tend to do it overnight but if you have time to let it dry during the day then that’s an option too.
TIP – when choosing the curlformers, read the guide to understand what will work best for your hair type. We would suggest the corkscrew or spiral for type 4 hair if you want to achieve a tight to medium curl pattern.
Wand Curls
With this method, you’ll be using heat to achieve spiral curls. Curl wands are curling irons without a clip. Instead of a clip holding the hair in place, you’ll wrap your hair around the wand and hold it in place for up to 30 seconds to achieve the curl. As it’s a heat tool, you’re likely to experience less frizz and achieve a full head of smooth spiral curls. NOTE: you don’t want to use this method regularly due to heat damage, always use a heat protectant!
Braid Out & Twist Out
Braid outs and Twists have many similarities, the only difference is in the name. You’re either going to braid or twist your hair. Both are easy to style and a great way to enhance your natural coils/curls.
Braid out steps : Once you’ve washed, conditioned and moisturised your hair. Part your hair into sections, you can apply a mousse or curly product and then braid. Make sure your hair is fully detangled prior to braiding and braid as close to your scalp as possible to achieve a smoother look. Once braided, let your hair air dry overnight and then loosen the braids. Apply a small amount of moisturising oil prior to removing the braids to minimise frizz. Then fluff out with an afro pick for added volume.
The purpose of a braid out is to enhance the hair into an even wave pattern, or curl pattern, all over the head from root to tip. Plus, you can also style the braid out into any style you like, such as high or low puffs, half-up and half-down styles.
Twist out steps : These steps are similar to the braid out steps listed above. The only difference is you’re twisting and securing sections of the hair instead of braiding it. The twist out texture is slightly different to the wavy texture of a braid out. Twist outs unify the hair texture into more of a spiral curl. There are various variations to a twist out which can enhance the curls even more. You can do flat twists, 3 strand twists, 2 strand twists or finger twists.
The great thing about these styles is they look even better on day 4 hair onwards. The curls tend to be tighter with less volume on day 1 – 3 and from day 4 onwards – you start to see more volume and looser curls.
Bantu Knot out
Bantu knots are great for any hair texture. If you’re transitioning, you’ll love it even more as it’s a great way to blend your natural curls with your straight ends. The results of bantu knots are a beautiful spiral effect once released. Bantu knots are small coiled buns made by twisting small sections of your hair and putting them into a secure knot. Leave the bantu knots for at least 4 hours before unravelling but if you can leave them overnight then even better. The longer you leave it, the more defined the curl pattern will be. One of their benefits of this method is it helps you retain and prevent frizziness when coiled up.
Flexi rods
Flexi rods are flexible foam rollers which bend easily to hold the curl in place when manipulated. They come in a variety of lengths and sizes for all hair lengths. You can even mix and match the curlers depending on what look you’re trying to achieve. All you have to do is section your hair into small or medium sections. Then wrap your hair around each one and then fold the ends inwards to keep the rollers in place while your curls set. The great thing about flexi rods is it offers a flexibility of curls. You can wrap your hair around the rollers inwards or outwards depending on your preference. You can also use flexi-rods when you do a braid out, by wrapping the ends of the braids in the curlers.
How to Maintain your curls overnight
- Scarf & Bonnet – alway sleep with a silk scarf or bonnet at night. This prevents your curls and coils from drying out whilst helping you maintain the style.
- Pineapple Method – this is one of the most popular methods for maintaining curls. The pineapple is a loose, high ponytail on top of your head which prevents frizz, knots and flattened curls that come with lying on a pillow. Use a satin scrunchie to avoid any dents or you could put your hair in a pineapple using a scarf. All you’ll need to do the next day is fluff it out and voila – perfect curls & coils.
- Re-twist or re-braid – if you’ve opted for a braid or twist out technique. You can always re-twist or braid at night for that extra definition the next day.
Frequently Asked Questions
1. Why are my curls not defined?
There are a variety of factors that could lead to this such as head damage, bleaching your hair, not enough moisture/balance and product build up. To be honest, the list can go on. Once you realise your curls are not defined, it’s worth trying to understand why. One of the things that could be a quick fix is using a clarifying shampoo and a clay mask to ensure your hair is clean and stripped of any damage. Once you’ve done that monitor your hair and products you use to see if one particular product makes a difference. If your hair is completely damaged, then you’ll need to nurse it back to health with a hair regimen which has a good balance of moisture and protein.
2. Why are my curls frizzy and undefined?
Although there are several factors that could lead to this – the 2 main contributors are not using a product that has enough hold and not enough moisture penetrating your strands. You may need to use something slightly stronger like a curling pudding and follow up with a gel. There are also a number of frizz control products you can incorporate into your hair regimen to combat frizz. Try a deep conditioner and leave in that has frizz free benefits.
3. Does finger coiling train curls?
Finger coiling is known for being great for those with damaged hair. As well as those who struggle to maintain a consistent curl pattern and those with frizzy hair who want maximum definition. You can use this method to curl train your hair to restore its “curl memory”. Note – you’ll have to do this alongside a structured hair regimen and be consistent to see results
Final Thoughts
Achieving more defined curls or curls begins with a great hair regimen which incorporates the right balance of moisture and protein. Whilst incorporating the right hair products into your curl routine. Luckily, there are several techniques you can follow to help you achieve more definition. The pick is really yours and it’s worth trying a couple to figure out your preference. It’s also important to remember that practice makes perfect, the technique you choose may not look exactly how you expected it to be the first time round. But the more you do it the better you’ll become. Remember, to experiment with different products to figure out what your hair responds to, you can try a mousse, gel, curling cream or custard. Just make sure you’re working from lightest to heaviest and get the balance right to minimise product build up.
We hope you found this guide helpful and free to ask a question in the comments.

