
Share This Article
This post may contain affiliate links and we may get paid a small commission if you click on a link.
Please read our privacy policy and cookies disclosure.
Mini Twists have become more and more popular over the last couple of months. If you’re on social media platforms such as TikTok and Instagram, you’ll see countless videos of why Natural Hair Girlies are loving this style. The term mini twists has generated millions of views on Tiktok, 27.4 mill to be exact and still climbing. Apart from the fact that it’s a great protective style. Naturalistas are boasting about the amount of hair growth and length they’re able to retain whilst rocking mini twists. So if you’re on the market for a new protective style that helps you achieve your natural hair growth goals, then mini twists might be the style for you! It’s easy to maintain and has multiple styling options.
We’ll cover everything you need to know to help you figure out if this is a hairstyle you should incorporate it into your natural hair routine more regularly. Keep reading to learn more!
Are Mini Twists Good For Natural Hair?
In a nutshell YES! Mini Twists are GREAT for natural hair especially Type 4 Naturalistas. They’re a protective style which minimises daily manipulation and helps you hold onto your new hair growth whilst retaining length. The twists are created by dividing your hair into small sections and then wrapping/rotating the strands of your hair across each other from root to tip until the twists are formed. The style can be done on any length or texture with or without the use of natural hair extensions.
Do Mini Twists Contribute To Hair Growth?
Twists alone can’t grow your hair as there are many factors that affect how quickly your hair grows such as genetics, scalp health, hair health etc. However, Twists can contribute to your hair’s growth ensuring your holding onto that new growth and retaining as much length as possible whilst wearing them. Here are 5 ways Mini Twists contribute to your hair growth.
- Protected ends : Your ends are protected in this style minimising wear and tear that comes with daily styling.
- Low tension Style : It’s a low tension style which reduces stress on your hairline and scalp keeping your hair in a healthy state which in return promotes hair growth
- Prevents single strand knots : As your hair is protected and tucked away, it reduces any excessive shedding and breakage that may come with daily manipulation and over styling.
- Prevents breakage : Keeping your hair in a protective style can help prevent excess breakage
- Helps retain moisture : you’ll be moisturising your twists regularly and oiling your scalp to prevent dryness. This will strengthen your hair strands and improve your hair’s elasticity.
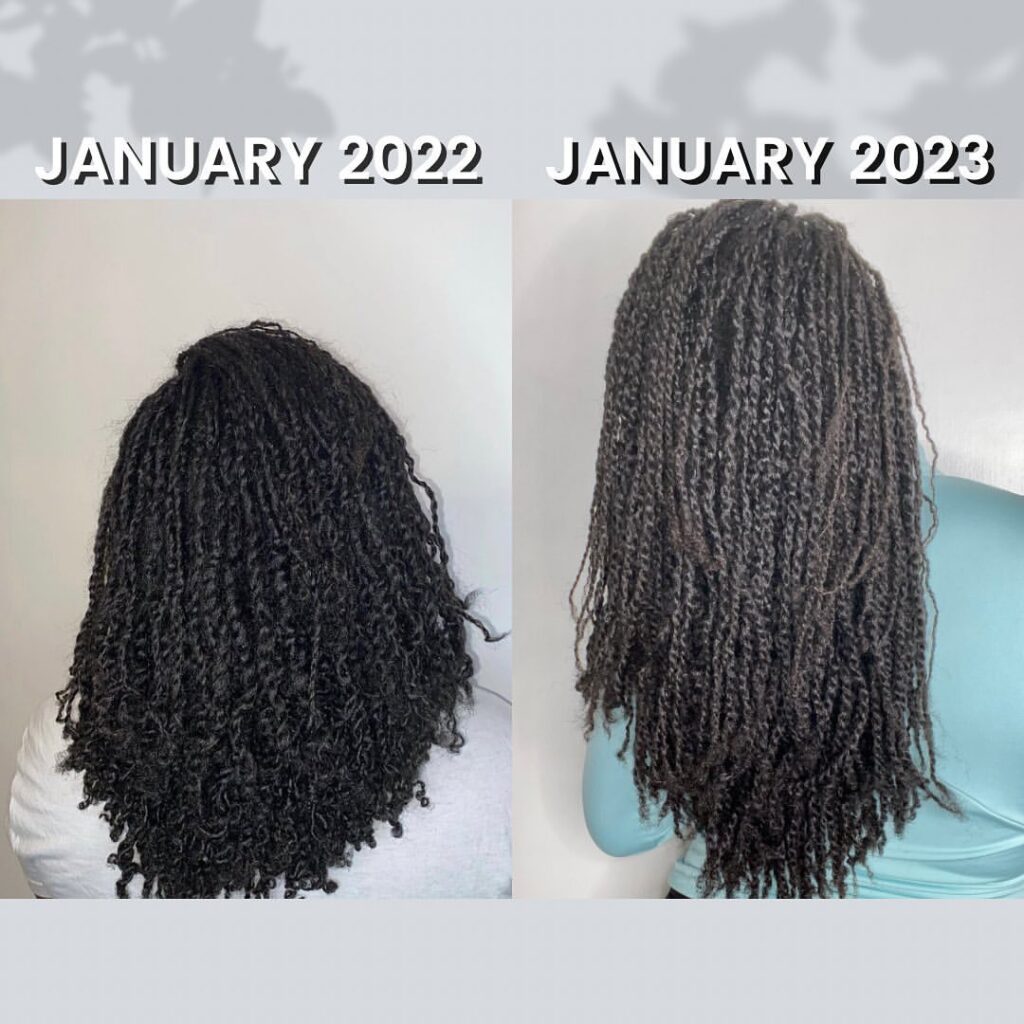
Take a look Shaneal’s hair growth comparison pics whilst wearing mini twists. Her instagram page @curlcodeblack documents her hair growth journey and you’ll notice mini twists are a regular part of her protective styling routine.

Aside from mini twists promoting hair growth, there are also other benefits to rocking this style. Such as,
- Easy to maintain
- Versatile Styling Options
- Easy removal process
- Reduces tangles
- Keeps scalp accessible
- Doubles up as a twist out after removal
How to do Mini twists?
Mini Twists are easy to do and are an inexpensive hairstyle which can be done by yourself as opposed to going to a hairstylist. All you need is a couple of hours, some patience and remember practice makes perfect. They may not look exactly how you envisioned the first time round but you’ll get better at it the more you do it. If you’re thinking about using hair extensions then it might be worth getting a friend to help or watching a tutorial to understand how to attach the extensions to your natural hair.
Before we get started on how to install your mini twists. You’ll need the following tools;
- Wash day products (Shampoo, Conditioner, Leave in)
- Detangling Brush
- Rat Tail comb
- Hair Clips/Separators
- A Twisting Butter or Cream
- Gel (Optional)
Step by Step Guide for Installing Mini Twists
Step 1 – Start off with freshly cleansed hair:
Follow your normal wash day routine. We recommend doing a deep conditioning treatment prior to getting any protective style to ensure the moisture from the product has fully penetrated through your hair strands.
Step 2 – Moisturise your hair and detangle thoroughly:
Apply your leave-in conditioner on damp hair and work through from root to tip. Finger detangle once product has been applied and follow up with a detangling brush to ensure product has been worked through all your hair strands whilst making sure your hair is fully detangled.
Step 3 – Section hair into 4 Parts:
You’ll be working in sections for this style, you’ll start with big sections and each section will get smaller as you go along. Use your hair clips to keep the hair in their allocated sections. You can also twist or braid each section if you prefer.
Step 4 – Work on 1 section at a time and split into smaller parts:
Use a rat tail comb to split the section into smaller parts of 1 – 2 inches depending on the size you’re trying to achieve. Apply your twisting butter or cream to the parted section to prep for twisting
Step 5 – Start twisting:
Separate the part you created into 2 equal parts and begin to twist the hair around each other in a rope like motion from root to tip. As you get towards the ends, you may need to apply more cream or butter if it feels dry and then twirl the ends with your fingers once the twist is complete.
Step 6 – Repeat:
Continue step 5 until you’ve completed your whole head of hair. TIP – It’s okay to take a break in between sections. The key is to be patient and not rush the process so your twists come out equally.
Step 7 – Seal ends with an oil:
Seal your ends with a lightweight oil such as jojoba, grapeseed or almond oil to lock in moisture.
NOTE: If you’re interested in doing the 3 strand twists, the process is pretty much the same. The difference is you’ll be splitting the parts into 3 sections and twist around each other. As a beginner, it’s best to stick to 2 strand twists until you’ve got the hang of things.
How long should I keep my mini twists?
Your twists have now been successfully installed so you’re probably wondering how long you should keep them in. The recommendation is anything from 4 – 8 weeks. Like any protective style, you’ll need to follow a maintenance routine to keep your scalp healthy to aid hair growth whilst wearing your mini twists. The great thing about mini twists is they’re easy to maintain and practical so your wash day doesn’t take as long as it normally does. One thing to bear in mind is that twists can loc your hair if they’re not properly maintained so make sure to create a maintenance routine you can stick to and pay attention to your twists especially at the roots if you decide to wear them for slightly longer.
How should I maintain my mini twists for hair growth?
Here are some things you can incorporate into your twist hair growth routine.
1. Keep on top of wash days
To keep your scalp healthy and minimise build up, you’ll want to stick to regular cleansing of your hair. To achieve hair growth whilst wearing your mini twists, you need to keep your scalp clean so it can thrive. It’s also best to wash your hair in sections to minimise frizz and stop the twists from rubbing against each other. You can always apply a mousse once you’ve finished to help with the frizz. Also, don’t forget to use a conditioner and apply a leave-in once you’ve finished shampooing.
2. Sleep with a silk or satin scarf and or bonnet
This is a must do if you want to retain moisture and minimise frizz. It’ll keep your hair neat and help you maintain your twists for longer. You can also sleep with a silk or satin pillowcase for that extra protection.
3. Avoid wearing your twists down all the time
Luckily, there are endless styling options when wearing this style. You’ll want to avoid wearing your hair down all the time so it doesn’t rub against your clothing. Hair rubbing against clothes can cause split ends and breakage. Although your hair is protected in twists, it’s worth being mindful of this especially if you wear alot of cotton. Cotton dries out hair and makes it harder for it to retain moisture.
4. Moisturise and seal your hair regularly
Afro textured hair thrives on moisture so make sure you do this 2 – 3 times a week if you want to achieve optimal growth and retain length whilst wearing your mini twists. You can mix your water with a leave-in conditioner and spritz on your hair. Then follow up with a lightweight oil to seal in the moisture
5. Apply hair growth oil
If hair growth is the main reason you’re interested in trying this style, then there’s no harm using a hair growth oil. Although these oils aren’t solely responsible for growing your hair. It can help it grow a little bit faster. Just be careful not to be heavy handed when applying to avoid product build up. Remember, to massage the oil into your scalp to improve blood circulation in the area.
How do you refresh mini twists?
Your twists won’t need to be refreshed very often if you’re keeping up with your maintenance routine. However, if you feel your twists are unravelling and not as neat as you would like. You can always re-do the twists around your hairline and nape of your neck to give it a fresher look. Just be careful when unravelling your twists as you don’t want to tug or pull on it. Apply an oil to the twists and unravel from tip to roots. Once unravelled, spritz your hair with water and detangle. We find finger detangling first and then following up with your detangling tool of choice is the best way to detangle without tugging or pulling on your hair.
6 Ways to Style Mini Twists
You won’t be bored when wearing mini twists, there are several styling options which makes this style more fun to wear. We’ve featured some of our favourite Naturalista’s for styling inspiration.
1. Bun and Ponytail styles
Credit : @curlcodeblack
2. Tribal Cornrows with Mini Twists
Credit : @opaglamz
5. Mini Twists with Curly ends
Credit : @bohosoulsalon (Stylist) @nyreephotography (Photographer) @silk_sachet (Model)
6. Space Buns
Credit : @yolandaas
* We’ve linked the instagram pages of all the Naturalistas featured. Feel free to check out their instagram pages for more natural hair inspo and give them a follow!
Mini Twist FAQ’s
1: Can mini twists turn into locs/dreads?
This isn’t something you need to worry about if you’re wearing the style for a short period of time. Although, two strand twists are known to be a loc’ing method. They only begin to loc when you keep them in for long periods. The locs tend to form from 6 – 24 months and there is a process you need to follow to keep the twists from unravelling to achieve dreadlocks. If you’re interested in using the method to to start your loc or dreads journey then it’s best to go to a stylist who specialises in this to help you achieve your desired look.
2: Should you put mini twists in wet or dry hair?
Installing twists on wet or dry hair is a personal preference. There isn’t a right or wrong way! Both have their pros and cons depending on what look you’re trying to achieve. If you’re a beginner, the recommendation is to do it on dry hair. Dry hair is easier to work with and will make parting a lot easier. Whilst wet hair is more fragile and your hair is likely to get dry half way through completing the twists.
For the best of both worlds, we recommend working on dry hair to make parting and sectioning easier. You can then spritz each parted section with water prior to applying your twisting cream or butter. Working on damp hair will help your product penetrate through your hair strands. It’ll also give your twists a tighter hold and your ends will have a slight curl. Do what works best for you, and if you’re in doubt watch a couple youtube tutorials to help you decide.
3: How long does it take to get mini twists?
Mini Twists can take anything from 3 hours to 6 hours depending on your hairs length and density. The size of your twists will also have a part to play in timings. If it’s your first time doing them by yourself then it’s best to allocate a full day. You’re likely to take breaks in between from your arms hurting and if you’re not used to parting your hair it’ll take you a little longer to get used to. Feel free to get a friend to help to speed up the process or you can go to a hairstylist if you want to save some time.
Final Thoughts
Mini Twists are a great protective style to help you achieve hair growth and retain length. Like any protective style, it’s important to have a maintenance routine to keep your scalp and hair healthy. It’s easy to maintain without adding any tension to your scalp which is a plus when trying to grow out your hair. Plus, there are so many styling options which makes it a fun style. We can see why mini twists has grown in popularity over the last couple of years.
We’re hoping you’ve taken some inspiration from the Naturalistas featured and want to take this opportunity to thank them for letting us share their pictures in this article.
Have you tried mini twists before? What has your experience been like using mini twists to achieve hair growth?

